14.2. PXE Boot Configuration
The next step is to copy the files necessary to start the installation to the tftp server so they can be found when the client requests them. The tftp server is usually the same server as the network server exporting the installation tree.
To copy these files, run the Network Booting Tool on the NFS, FTP, or HTTP server. A separate PXE server is not necessary.
For the command line version of these instructions, refer to Section 14.2.1 Command Line Configuration.
To use the graphical version of the Network Booting Tool, you must be running the X Window System, have root privileges, and have the redhat-config-netboot RPM package installed. To start the Network Booting Tool from the desktop, go to the Main Menu Button (on the Panel) => System Settings => Server Settings => Network Booting Service. Or, type the command redhat-config-netboot at a shell prompt (for example, in an XTerm or a GNOME terminal).
If starting the Network Booting Tool for the first time, select Network Install from the First Time Druid. Otherwise, select Configure => Network Installation from the pull-down menu, and then click Add. The dialog in Figure 14-1 is displayed.
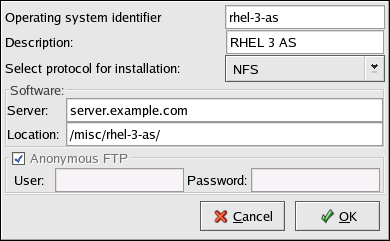
Provide the following information:
Operating system identifier — Provide a unique name using one word to identify the Red Hat Enterprise Linux version and variant. It is used as the directory name in the /tftpboot/linux-install/ directory.
Description — Provide a brief description of the Red Hat Enterprise Linux version and variant.
Select protocol for installation — Select NFS, FTP, or HTTP as the network installation type depending on which one was configured previously. If FTP is selected and anonymous FTP is not being used, uncheck Anonymous FTP and provide a valid username and password combination.
Server — Provide the IP address or domain name of the NFS, FTP, or HTTP server.
Location — Provide the directory shared by the network server. If FTP or HTTP was selected, the directory must be relative to the default directory for the FTP server or the document root for the HTTP server. For all network installations, the directory provided must contain the RedHat/ directory of the installation tree.
After clicking OK, the initrd.img and vmlinuz files necessary to boot the installation program are transfered from images/pxeboot/ in the provided installation tree to /tftpboot/linux-install/<os-identifier>/ on the tftp server (the one you are running the Network Booting Tool on).
14.2.1. Command Line Configuration
If the network server is not running X, the pxeos command line utility, which is part of the redhat-config-netboot package, can be used to configure the tftp server files as described in Section 14.4 Starting the tftp Server:
pxeos -a -i "<description>" -p <NFS|HTTP|FTP> -D 0 -s client.example.com \ -L <net-location> <os-identifer> |
The following list explains the options:
-a — Specifies that an OS instance is being added to the PXE configuration.
-i "<description>" — Replace "<description>" with a description of the OS instance. This corresponds to the Description field in Figure 14-1.
-p <NFS|HTTP|FTP> — Specify which of the NFS, FTP, or HTTP protocols to use for installation. Only one may be specified. This corresponds to the Select protocol for installation menu in Figure 14-1.
-D 0 — Indicates that it is not a diskless configuration since pxeos can be used to configure a diskless environment as well.
-s client.example.com — Provide the name of the NFS, FTP, or HTTP server after the -s option. This corresponds to the Server field in Figure 14-1.
-L <net-location> — Provide the location of the installation tree on that server after the -L option. This corresponds to the Location field in Figure 14-1.
<os-identifer> — Specify the OS identifier, which is used as the directory name in the /tftpboot/linux-install/ directory. This corresponds to the Operating system identifier field in Figure 14-1.
If FTP is selected as the installation protocol and anonymous login is not available, specify a username and password for login, with the following options before <os-identifer> in the previous command:
-A 0 -u <username> -p <password> |